Thursday, May 22, 2014

Globe GoSurf: New Internet Promo For Prepaid & Postpaid

Great news for Globe subscribers, Globe has launched its new promo the codename GoSurf which is basically like Powersurf, in fact this is the replacement of Powersurf. Same as the previous promo, Gosurf lets you subscribe per MB (Megabytes) with additional perks such as a Spotify access with separate data allocation, and come to think of it they also improved the duration and MB bandwidth allocation compared to powersurf with the same price.

Thing you shouldn't do when subscribe to Go Surf.
  • Download huge files (movies, games, etc.)
  • Stream on Youtube and related sites.
  • Browse on desktop, laptop, netbook, etc. (Optional)
Note: Globe GoSurf promo is strictly for smartphone use only. Unless you have huge data subscription. Desktop size web pages consumes lots of data since desktop size pages has lots of components (big images, JavaScript, jquery, etc.)

Globe GoSurf for Postpaid Subscribers
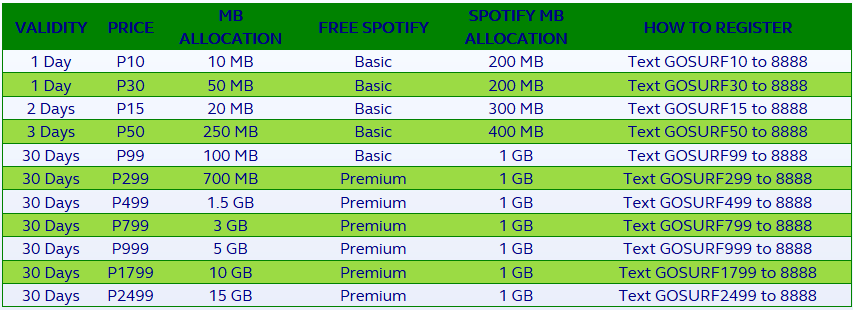
globe gosurf postpaid codes
Its very simple to register, just follow the table above and your good to go, for example to register to GOSURF 30 just key in GOSURF (space 30) send to 8888.

Globe GoSurf for Prepaid Subscribers
Globe gosurf prepaid codes
Prepaid subscription is quite cheaper compared to postpaid, imagine for P10 only with 10MB and free 200MB spotify allocation. Just register using keyword GOSURF10 to 8888.

How To Root Lenovo Ideaphone A390

How To Root Lenovo Ideaphone A390 

Root Lenovo Ideaphone A390
This root tutorial will include CWM recovery, and rooting tutorial on Lenovo Ideaphone A390.

Lenovo Ideaphone A390 Specification:
  • Network: 2G Network GSM 900 / 1800 - SIM 1 & SIM 2 3G Network HSDPA 2100
  • Display Type: Capacitive touchscreen
  • Screen Size: 4.0 inches
  • Sim: Dual Sim (Standard Sim)
  • WiFi: Wi-Fi 802.11 b/g/n, Wi-Fi hotspot
  • Internal Memory: 4 GB, 512 MB RAM
  • Card Slot: microSD, up to 32 GB
  • Camera: 5 MP, 2592 х 1944 pixels
  • Front Camera: No
  • OS: Android OS, v4.0.4 (Ice Cream Sandwich)
  • Processor: Dual-core 1 GHz
  • FM radio
  • Battery: Li-Ion 1500 mAh battery


Recovery for Lenovo Ideaphone A390

Tools :
1. Driver: http://lenovo-forums.ru/Files/OS/A39...5xx_Driver.zip
2. Flash Tool: http://lenovo-forums.ru/Files/OS/A39...v3.1224.01.zip
3. Recovery: http://lenovo-forums.ru/Files/OS/A39..._A390_S312.zip


Step 1: unzip the downloaded file (TWRP_v2.4.4.0_A390_S312.zip)


Step 2: To install the drivers for the computer, turn off the phone, connect to the computer, the computer will notify the Preloader MT6577 driver installation, unzip the folder driver in the extracted folder run the InstallDriver.exe. After the driver installation is complete you can disconnect the device.

Step 3: Open the folder Flash_tool software Flash, click the scatter-loading, choose MT6577_Android_scatter, look for recovery in the unzip folder, click OK. Click the Recovery button below if it is not built (and built by default).

Step 4: Click on the word download on, you will see a dialogue you choose '' yes'' and quickly plugged into the usb and it will automatically load the file recovery on your machine (the phone must be off)
4a. After plugging the phone into the flash-tool will show the power status bar red to yellow then wait for the message "OK" green is successful, then disconnect the phone and you have recovery.

Step 5: Access recovery mode by pressing volume up + home + power key until vibrates or the phone boot into recovery mode, then let go. This time open Team Win Recovery. You now have TW recovery you can now root your device. (Make android backup first before rooting you phone)


Rooting Lenovo Ideaphone A390


  1. After boot in recovery it will ask you to install superSU just drag/swipe to install.
  2. Your now rooted!

NOTE: Internet connection required when rooting because when you
open the superSU after reboot it will ask you to download the full root file.

TAGS: Lenovo A390, Rooting, mobile hacking

Globe Free Internet For Android Using Opera Mini

Globe Free Internet For Android Using FREEAYOSDITO Opera Mini 


There's a new trick running around that gives 1 month internet for free, but the usual problem it has 10MB per day limitation and it only allows you to surf ayosdito.ph domain, well that's not free at all since your just going to browse ads at ayosdito.
freeayosdito free internet

Here comes our heroes, the opera mini modifiers which basically looks for loopholes to bypass data allocation and browse any site on the net, and that's what we are going to discuss on this post.

Prerequisites:
Procedure:
1. First, register to FREEAYOSDITO to 8888 for free. This will register you to 1 month internet with 10MB per day.
2. Then, go to settings>mobile networks>APN and create new APN and follow the settings below
  • Name: Ayosdito or Any name
  • APN: http.globe.com.ph
  • Proxy: 141.0.11.95
  • Port: 80
  • Authentication: PAP or CHAP
Leave other settings as is. Check the picture below for more info.
freeayosdito apn settings
3. Install the modded opera mini and enjoy downloading and browsing.
Note: The FREEAYOSDITO promo of Globe will still work on other phones, OS, PC but won't get the benefits of this tutorial. 

TAGS: Globe free internet, Opera Mini hacked

SMART LTE Bug: Free Internet Android, PC, Pocket WIFI

Tags: Smart free internet, LTE sim bugging,android, pocket wifi hacking

SMART LTE Bug: Free Internet Android, PC, Pocket WIFI  

A new trick has been discovered by the experts in bugging, since the infamous Globe has been gone for some time, hackers found a way to bug the SMART LTE SIM. How to have free LTE internet without expiration? We have a few methods credits to Symbianize forums for the effort. Basically we will use your Android phone or SMART Bro USB broadband or any unlocked broadband or even SMART pocket WIFI.

SMART LTE bug
Requirements:
  • SMART LTE SIM (Recommended prefixes 0949, 0928, 0947) or any will do.
  • Php50.00 load
  • Android phone, or iPhone, or SMART USB broadband, or pocket WIFI
Procedure for Android phone or iPhone using flight mode:
  1. First, register to LTE (space) 50 and send to 2200 and wait for the confirmation message.
  2. Then, register to UNLISURF (space) 50 and send to 2200, this time do this even without load. You will receive a message service unavailable.
  3. Connect to the internet, just take not that you must have the following starting IP's (10.140/155/159/181 for Luzon) and (10.141/159 for Visayas/Mindanao area).
  4. Enter flight mode (AKA Airplane mode) 30 minutes or 1 hour before expiration to the LTE promo.
  5. Disable the Airplane mode after one hour and try to connect to the internet
  6. If its successful, congratulations your SIM is now bug with a very long expiration date, just make sure you have one of those LTE IP.
Bug SMART LTE using USB Broadband or Pocket WIFI:
  1. Register to LTE 50 send to 2200
  2. Again, register to UNLISURF 50 send to 2200 and you will receive service unavailable but that's okay.
  3. Connect your USB modem, and remember to take note of the IP (10.140/155/159/181 for Luzon) and (10.141/159 for Visayas/Mindanao area).  To check your IP on PC, run CMD and type "ipconfig/all" without quotes.
  4. Use and disconnect the internet as much as you like, but....
  5. Disconnect 30 minutes or 1 hour before expiration, after that connect again and check if you can access the internet, if you can connect then your SIM is now bugged.
Note: This might not work all the time, so do this at your own risk. But there are many accounts of successful bugging, for now this is the best trick to bug SMART LTE SIM for unlimited free internet.


List of Smart Call and Text promo

This is the smart communication list of promo and the text code.


All In 99

Now you can stay connected for 7 days! Enjoy Unli All Net texts, 100 minutes of calls to Smart, Talk ‘N Text, and Sun, 80MB of surfing data and Unli Facebook for only P99!
Text Allin99 to 2827 to register.

Unli Call & Text 299

Now, you can Call & Text like there’s no tomorrow! Enjoy unlimited calls & texts to Smart/TNT + 150 texts to all networks for only P299 valid for 15 days!
Text UNLI299 to 6406 to register.

Unli Call & Text 200

Now, you can Call & Text like there’s no tomorrow! Enjoy unlimited calls & texts to Smart/TNT + 500 texts to all networks for only P200 valid for 7 days!
Text UNLI200 to 6406 to register.

Unli Call & Text 150

Now, you can Call & Text like there’s no tomorrow! Enjoy unlimitied calls & texts to Smart/TNT + 100 texts to all networks for only P150 valid for 7 days!
Text UNLI150 to 6406 to register.

Unli Call & Text 100

Now, you can Call & Text like there’s no tomorrow! Enjoy unli calls & texts to Smart/TNT + 80 texts to all networks for only P100 valid for 4 days!
Text UNLI100 to 6406 to register.

Unli Call & Text 50

Now, you can Call & Text like there’s no tomorrow! Enjoy two days of unlimited calls to SMART/TNT/SUN, unlimited texts to all networks + FREE chat & surf (up to 30MB) for only P50!
Text UNLI50 to 6406 to register.

Unli Call & Text 30

Now, you can Call & Text like there’s no tomorrow! Enjoy unlimited calls to SMART/TNT/SUN, unlimited texts to all networks + FREE Chat & Surf (up to 15MB) for only P30 a day!
Text UNLI30 to 6406 to register.

Unli Call & Text 600

Now, you can Call & Text like there’s no tomorrow! Enjoy unli calls & texts to Smart/TNT + 2000 texts to all networks for only P600 valid for 30 days!
Text UNLI600 to 6406 to register.

Unli Call & Text 25

Now, you can Call & Text like there’s no tomorrow! Enjoy unlimited calls to SMART/TNT, unlimited texts to SMART/TNT/SUN, 50 texts to all networks + FREE chat & surf (up to 15MB) for only P25 a day!
Text UNLI25 to 6406 to register.

Unli Call & Text 35

Now, you can Call & Text like there’s no tomorrow! Enjoy unli calls & texts to Smart/TNT/Sun + 150 texts to all networks for only P35 a day!
Text UNLI35 to 6406

Unli Call & Text 400

Now, you can Call & Text like there’s no tomorrow! Enjoy unli calls & texts to Smart/TNT + 1000 texts to all networks for only P400 valid for 15 days!
Text UNLI400 to 6406 to register.

Smartalk 500

Enjoy unli calls to Smart/TNT for only P500 valid for 30 days!
Text TALK500 to 6400

Smartalk 100

Enjoy unli calls to Smart/TNT for only P100 valid for 5 days!
Text TALK100 to 6400

All Text 20

Make your texts count with ALLTXT!
Enjoy unli all-net texts for just P20 a day, plus get 20 minutes of calls to SMART and TNT and free chat & surf!
Text AT20 to 2827 to register.

Lahatxt 30

Lets you send 300 SMS to all networks and enjoy 20 mins of calls to Smart/TNT subscribers for 2 days!
Text L30 to 2266

All Text 100

Get unlimited ALL network SMS and 100 minutes of calls to SMART and TNT.
valid for 7 days
Text AT100 to 2827

All Text 15

Make your texts count with ALLTXT!
Enjoy 150 texts to all networks and 5 minutes calls to Smart/TNT for just P15 valid for 1 day!
Text AT15 to 2827 to register.

Big Unli Text 50

Enjoy 7 days of unlimited tri-net texts for only P50!
Send Text 50 to 6406 

Big Unli Text 200

Enjoy 30 days of unlimited tri-net texts for only P200!
Text TEXT200 to 6406 

Big Unli Text 100

Enjoy 15 days of unlimited tri-net texts for only P100!
Text TEXT100 to 6406!

Big Calls 100

Enjoy 200 minutes of calls to Smart and Talk ‘N Text for 7 days, for only P100!
Text CALL100 to 6406 

Big Calls 200

Enjoy 450 minutes of calls to Smart and Talk ‘N Text for 15 days, for only P200!
Text CALL200 to 6406 

Big Calls 400

Enjoy 950 minutes of calls to Smart and Talk ‘N Text for 30 days, for only P400!
Text CALL400 to 6406 

TRI-NET 300

Now, a TriNet offer that is available for all three networks! Connect on Smart/Sun/TnT and enjoy unli text, 300 mins. of calls, and 30MB of mobile Internet for only P300! Valid for 30 days!

Text TRINET300 to 2477 

All-Net SOS

Say goodbye load emergencies, 'coz you can now borrow SMS from Smart!

All Text 30

Make your texts count with ALLTXT!
Enjoy unli all-net texts and 30 minutes calls to Smart/TNT for just P30 valid for 2 days!
Text AT30 to 2827 to register.

TRI-NET 100

Reconnecting with someone just became easier and better. Receive 750 to all networks, 120 mins of calls to Smart/TNT/SUN plus 35MB data for 7 days with Trinet 100. 
Text TRINET100 to 2477 to register.

Lahatxt 20

Lets you send 250 SMS to all networks and enjoy 10 mins of calls to Smart/TNT subscribers for 1 day!
Text L20 to 2266

TRI-NET 15

Reconnecting just became easier! Enjoy unlimited texts to all your Smart/TNT/SUN contacts with Trinet 15.
Text Trinet 15 to 2477
Text Trinet 15 to 2477 to register.

TOTAL 20 

Tri-net unli text + 20 mins calls + 20 all Net texts

TRI-NET 30

Reconnecting with someone just became easier and better. Receive 200 texts to all networks, 50 mins of calls to Smart/TNT/SUN plus 10MB data for 1 day with Trinet 30. 
Text TRINET30 to 2477
Text TRINET30 to 2477 to register.

TRI-NET 40

Enjoy unlimited tri-net calls, texts and Facebook with Tri-net 40!
Text TRINET40 to 2949

TRI-NET 200

Reconnecting with someone just became easier and better. Receive 1500 texts to all networks, 250 mins of calls to Smart/TNT/SUN plus 75MB data for 15 days with Trinet 100. 
Text TRINET200 to 2477 

TRI-NET 400

Reconnecting with someone just became easier and better. Receive 3000 texts to all networks, 500 mins of calls to Smart/TNT/SUN plus 35MB data for 30 days with Trinet 400. 
Text TRINET400 to 2477

Tags: Smart internet promo, smart call and text promo


Smart Best promo offers

All In 99


Now your week's covered with Smart All In 99!


Enjoy Unli All Net texts, 100 minutes of calls to Smart, Talk ‘N Text, and Sun, 80MB surfing data, and Unli Facebook for only P99, valid for 7 days!
Text Allin99 to 2827.

Wednesday, May 21, 2014

Configuration commands for Wimax BM622m

Configuration commands for Wimax BM622m

Scanset
sncfg set WMX_FREQ_LIST 2622000
sncfg commit

optional: sncfg set WMX_FREQ_LIST 2622000,2602000
(depende na sayo kung ilang frequenct ang  ilagya mo)


Domain : NAI / user id / pass

sncfg set WMX_ANONYMOUS_ID 04C06F60E5C2@globelines.com.ph
sncfg set WMX_USER_NAME 2008x6T5FeRzUIY3@globelines.com.ph
sncfg set WMX_PASSW 2008x6T5FeRzUIY3
sncfg commit
sncfg wimax disconnect
sncfg wimax connect

Tags: Wimax BM622m, Wimax configuration commands

Tutorials on how the Windaows XP boot faster

Boot Your Windows XP Operating System Faster

Tags: Windows XP Tweaks, Computer Tips
Step by step Procedures:

1. Open notepad.exe, type "del c:\windows\prefetch\ntosboot-*.* /q" (without the quotes) & save as "ntosboot.bat" in c:\

2. From the Start menu, select "Run..." & type "gpedit.msc".

3. Double click "Windows Settings" under "Computer Configuration" and double click again on "Shutdown" in the right window.

4. In the new window, click "add", "Browse", locate your "ntosboot.bat" file & click "Open".

5. Click "OK", "Apply" & "OK" once again to exit.

6. From the Start menu, select "Run..." & type "devmgmt.msc".

7. Double click on "IDE ATA/ATAPI controllers"

8. Right click on "Primary IDE Channel" and select "Properties".

9. Select the "Advanced Settings" tab then on the device or 1 that doesn't have 'device type' greyed out select 'none' instead of 'autodetect' & click "OK".

10. Right click on "Secondary IDE channel", select "Properties" and repeat step 9.

11. Reboot your computer.

Tags: Windows XP Tweaks, Computer Tips 

How to downgrade Wimax BM622i

BM622i Downgrading Procedure

Tags: How to change mac address of BM622i " telnet" , Downgrading bm6221, Wimax patch configuration protection

This is the easy way tutorial on how to downgrade and change MAC address on BM622i WiMAX modem for public. You'll need 50 pesos for the hardware (SPI Flasher/LPT).

Download the rar file that include:

  • BM622i bin 2010
  • bm622i_public pdf file full tutorial
  • X-Ways.WinHex.v15.9.SR-7
  • SPI FlashROM Programmer 1.9c


SPI FlashROM Programmer 1.9c
****************************

SPIPGM      - binary for Linux
SPIPGM.EXE  - binary for DOS/Win9x
SPIPGMW.EXE - binary for Win9x/NT/2k/XP
IOPERM.DLL  - low-level HW access library for Win9x/NT/2k/XP/Vista/7(NoUAC)

Version 1.7+ has improved LPT port handling resulting in 1,6x faster reading

SPI FlashROM supported:
***********************

AMIC:
A25L05PU/PT (64kB)
A25L10PU/PT (128kB)
A25L20PU/PT (256kB)
A25L40PU/PT (512kB)
A25L80PU/PT (1MB)
A25L16PU/PT (2MB)
A25L32PU/PT (4MB)
A25L64PU/PT (8MB)
A25L512 (64kB)
A25L010 (128kB)
A25L020 (256kB)
A25L040 (512kB)
A25L080 (1MB)

Atmel:
AT26F004 (512kB)
AT26DF041 (512kB)
AT26DF081A (1MB)
AT26DF161A (2MB)
AT26DF321 (4MB)

EON:
EN25P16 (2MB)
EN25P32 (4MB)
EN25P64 (8MB)
EN25P128 (16MB)
EN25F20 (256kB)
EN25F40 (512kB)
EN25F80 (1024B)
EN25F16 (2MB)
EN25F32 (4MB)
EN25F64 (8MB)
EN25F128 (16MB)

ESMT:
F25L004A (512kB)
F25S04PA (512kB)
F25L08PA (1024B)
F25L16PA (2MB)
F25L32PA (4MB)
F25L32QA (4MB)

Macronix:
MX25L1005 (128kB)
MX25L2005 (256kB)
MX25L4005 (512kB)
MX25L8005 (1MB)
MX25L1605 (2MB)
MX25L3205 (4MB)
MX25L6405 (8MB)

PMC:
Pm25LV512A (64kB)
Pm25LV010A (128kB)
Pm25LV020 (256kB)
Pm25LV040 (512kB)
Pm25LV080B (1MB)
Pm25LV016B (2MB)
Pm25LV032B (4MB)
Pm25LV064B (8MB)

Spansion:
S25FL004A (512kB)
S25FL008A (1MB)
S25FL016A (2MB)
S25FL032A (4MB)
S25FL064A (8MB)
S25FL128P "16MB" BM622i Model

SST:
SST25VF010 (128kB)
SST25VF020 (256kB)
SST25VF040 (512kB)
SST25VF080 (1MB)
SST25VF016 (2MB)
SST25VF032 (4MB)
SST25VF064 (8MB)
SST25VF128 (16MB)
SST26VF016 (2MB)
SST26VF032 (4MB)
SST26VF064 (8MB)
SST25VF064C (8MB)

ST Microelectronic:
M25P10 (128kB)
M25P20 (256kB)
M25P40 (512kB)
M25P80 (1MB)
M25P16 (2MB)
M25P32 (4MB)
M25P64 (8MB)
M25P128 "16MB" BM622i Model

Winbond:
W25Q10 (128kB)
W25Q20BV (256kB)
W25Q40BV (512kB)
W25Q80BV (1MB)
W25Q16BV (2MB)
W25Q32BV (4MB)
W25Q64BV (8MB)
W25Q128BV (16MB)
W25X10 (128kB)
W25X20 (256kB)
W25X40 (512kB)
W25X80 (1MB)
W25X16 (2MB)
W25X32 (4MB)
W25X64 (8MB)

 Tags: How to change mac address of BM622i " telnet" , Downgrading bm6221, Wimax patch configuration protection


How to Change Mac Address of Huawei Wimax Bm622m

How to Change Mac Address of Bm622m


Step 1. Open your browser and type 192.168.254.1 then Login as user.
Username: user
Password: 0SlO051O

Step 2. Paste this to your browser http://192.168.254.1/advanced/acl.html then check "telnet" and Apply.
Step 3. Click run and  type 192.168.254.1

Step 4.
Login : Firefly
Password: $P4mb1h1r4N4m4nT0!!


sncfg dset WAN_MAC (04:C0:6F:60:AA:AA)
sncfg dset LAN_MAC (04:C0:6F:60:AA:AB)
sncfg commit
sncfg reload
reboot


Step 5. Copy your wan mac address and generate it using wimax pass gen

Download : Wimax Password Generator

Step 6. Go to http://192.168.254.1/wimax/security.html apply user and pass generated.
 Tags: Wimax , How to change MAC address of BM622m

Friday, May 9, 2014

iPhone Hints and Tricks

iPhone Hints and Tricks

Tags: iPhone Smart Phone

Whether you are a new user or a seasoned user of Apple’s iPhone, you're most likely not making use of your smartphone to the absolute maximum. With these simple tips and tricks, you won’t learn everything about your iPhone, but you will definitely become a more proficient user.


iPhone Tips & Tricks

You can take a screenshot.
From saving content you view on your mobile browser to taking quick snaps of funny texts, taking a screenshot can be incredibly useful in a lot of ways. Taking a quick snap of whatever is on your iPhone’s display is super quick and easy; simply press the home key at the bottom of your phone at the same time as the button at the top of the device. Your screenshot will be saved to your camera roll.

Have Fun With Siri
If you add the address for people in your contact list and then ask Siri to take you to them, she will give you directions to their house. Telling Siri about your relations will cause her to ask to remember them. If you agree, she will remember. Then, whenever you ask her to name your relation, she will. e.g. Telling Siri that Rebecca is my sister will make her tell that Rebecca is your sister whenever you ask the question, "Who is my sister?"

Instant Scrolling
If you have scrolled down a really long web page, then just tap the bar on the top of your screen to immediately be taken to the top of it.

Automatic Backup
To automatically backup your iPhone on iCloud, go to Settings > iCloud > Storage & Backup and turn on iCloud Backup. This will automatically backup your phone's critical data without the need to synchronize it again and again.

Caps Lock
To type in capital letters, just enable Caps Lock on your phone by double tapping the Shift arrow.

Extend Battery Life
If you feel that your iPhone's battery performance is below par, you can increase it by disabling 3G, Bluetooth and push notifications. Just go to Settings> General> Network to do this.

Use the Home Button
Pressing the Home button once will take you to your Main Screen. Pressing it twice will take you to Spotlight Search which you can use to search everything on your phone.

Control what appears in Spotlight search
To control what appears in Spotlight search, go to Settings> General> Spotlight Search and select according to your needs.

Block Inappropriate Content
To do so, go to Settings> General> Restrictions and tap Enable Restrictions. This will allow you to add a pass code and select which apps you want to make accessible.

Download Apps and Music on all your iProducts
If you have many Apple devices and don't want to download the same apps or music on them again and again, you can enable automatic downloads for apps, music and iBooks by going to Settings> Store.

Send Read Receipts in iMessage
You can let others know when you have read their text messages by enabling "Send Receipts" from Settings> Messages.

Close Programs Running in the Background
Just double tap the Home Button, then hold your finger down on the app you would like to close. Then, once it starts shaking, tap the red minus icon to close. This will be of huge help if you find that your phone is running slowly.

You can be a master of autocorrect.
If you are typing a note or an e-mail, you may have had some issues with the iPhone’s autocorrect or autocomplete features. Sometimes the results from this feature are helpful and right on, but other times they are anything but helpful. If you pay attention when you type, you don’t have to be at the mercy of your iPhone. A little textbox will pop up and recommend a spelling or a completed word; to accept it press the space key. If you don’t want to accept the word, tap the tiny “x” that appears next to it. This can help you avoid some faux pas when texting.

Create your own dictionary.
Speaking of autocorrect and autocomplete, you can create your own dictionary. When you enter a custom dictionary, your phone will autocorrect and autocomplete the things you type by inserting words you actually use. To do this, go to “Settings” and then “General.” In this menu, scroll down to the shortcuts area and tap “Add New Shortcut.” Not only will this let you enter in custom dictionary words, but you can also enter in shortcuts so that your abbreviations will end up inputting complete words in texts and emails.

Have custom ring tones for less money.
Your iPhone comes with many ringtones and message tones, but these are the same sounds that millions of other iPhone users are utilizing. If you want something unique, you may be tempted to shell out big bucks for custom ring tones. If you like to assign special ringtones to certain people or groups, this may cost you a lot. So, in order to get ringtones without breaking the bank (and taking away your app budget), you should look at applications that allow you to make ringtones out of songs you already have on your phone. Some of these cost money and should only be bought if you want to create a lot of ringtones. If you are only looking to turn out a couple of tones, you can even get a free version of these popular apps.

Block your number from other people’s caller ID.
Blocking your number can be helpful for any number of reasons. Maybe you don’t want an ex that you need to call to have your new number, or possibly you are using your personal number for business, but you don’t want professional contacts to have your personal digits. You can block your number easily from the “Settings” menu. There, you should go to the “phone” area and select the “Show My Caller ID” option; there you need to slide over to “no.” To switch it back on, follow the same steps and slide over to “yes.”

Multitask like nobodies’ business.
One of the reasons many preferred Android to the iPhone was because it offered better multitasking. As the iOS developed, multitasking has improved. When you need to quickly switch from one app to another, you simply have to press the home button to leave an app. Then double click the home key again to reveal your most recently used apps at the bottom of the screen. A quick swipe of the finger will allow you to flick through all recently used applications, allowing you to quickly hop from one application to another; thus making you more productive. 


iPhone Hints and Tricks

Tags: iPhone Smart Phone

How to Increase Battery Life on Android Mobile Phones

How to Increase Battery Life on Android Mobile Phones
Tags: Android Apps, Increase Battery lifespan

Anyone who has a smartphone knows that battery life is an issue. At the moment, the smartphone industry tends to favor performance over battery life when developing specifications for their new devices. To be perfectly honest, I am all for this. I would argue that it's better to have a zippy phone that acts quickly when I need it to rather than a slow, less sleek device that can withstand a few days of use without charging.
This is probably because I've mastered getting what I need from my phone while using the smallest amount of battery resources possible. Getting the best battery life from your phone can be somewhat complicated because everyone has a different opinion on what you should use and which (if any) features you should sacrifice to conserve battery. Fortunately, I have a simple method that works for every Android phone I've ever encountered.


Increase Android Battery Life

Display Screen

As a universal fact across all phones, the biggest drain on your battery is your display screen. Personally, I've found the auto-brightness control to work extremely well. To adjust to auto-brightness, go to 
Settings Display settings Brightness, and then just check Automatic brightness. It dims the brightness when you're in darker rooms (as it doesn't need to compete against other light sources and glare), but will really up the brightness if you're outside so that your phone is actually usable. However, if I'm really trying to conserve battery, I will turn off auto-brightness and set the brightness to very low (around 25%).

Also, be sure that you don't have an extremely long timeout (inactivity time before your screen automatically shuts off) as this will drain your battery. I personally just prefer shutting the screen off manually by pressing the power button rather than waiting for a timeout; this way my phone won't timeout on me when I am just reading something on it.

Live Wallpapers
Live wallpapers have a considerable impact on your battery life. Not using them is always a good idea if you want the best time from your battery.

Close Unnecessary Applications
If your phone has some applications running that you are not currently using, you should close them from the Task manager to avoid putting unwanted pressure on your phone which in turn will cause your battery to drain quickly.

Reduce Volume of speakers
Lowering volume of your phone's speakers can also have noticeable improvements in your phone's battery life.

The Power Control Widget

If you have a fairly recent phone (anything running Android 2.1 or higher), you are already blessed with a completely awesome "Power control" widget. If your phone does not have this widget, you could always download one from the Play store. This is a must for your home-screen. With this widget, you can enable and disable WiFi, Bluetooth, GPS, and Auto-sync in addition to adjusting brightness levels between auto, low, medium, and high.

The only thing this widget left me wanting was the ability to enable and disable mobile wireless networks(3G and/or 4G network). Some phones allow you to do this by pulling down the "status bar" at the top of your phone (where notifications, battery life, and signal are) and selecting or unselecting "Mobile data." Other phones allow you to control mobile wireless networks by holding down the power button. Worst case scenario, you can adjust it in "Settings."

Now, when to enable and disable these features, all boils down to preference. I only use Bluetooth, WiFi, and GPS as I need it; otherwise it's off. If you have a WiFi connection available, it's generally better for your battery to use it rather than using your mobile wireless network (especially if you get poor signal for your mobile wireless).


How to Increase Battery Life on Android Mobile Phones
Tags: Android Apps, Increase Battery lifespan

How to Change Facebook Theme, Color & Appearance

How to Change Facebook Theme, Color & Appearance 

Tags: Facebook, Facebook Themes, Facebook Tricks

Facebook is a social networking site which enables people to connect with friends and people around. That's how Facebook is usually introduced. However, Facebook is beyond the need of being introduced as almost everyone is on it. Despite its popularity, Facebook has one flaw; the default blue theme is really boring.
Some even consider it an annoyance while visiting Facebook. As Facebook does not allow users to change its theme like MySpace used to, users are left with no other option but to bear the theme Facebook wants them to use.

However, it is relatively easy to change the Facebook theme to a stylish one using an addon and custom themes which are available free of cost on the internet.

An example of the final outcome would be something like in the image.

Change Facebook Theme
This is the Ferrari theme. More themes are available for you to choose.


Requirement: The basic requirement for this to work is to have Mozilla Firefox or Google Chrome as your browser.
Steps to achieve this: If you use Google Chrome, click here. Mozilla Firefox users should carry out the following steps to successfully change Facebook theme.
  1. Open Mozilla Firefox and install 'Stylish' addon.
  2. Follow the basic steps to install the addon.
  3. Restart Firefox after successfully installing the Stylish addon.
  4. Login to your Facebook Account and click on the small 'S' button in your Firefox status bar.
  5. Click on "Find Styles for this Site" to open a new tab with free themes to use for Facebook.
  6. Click on any theme and a preview will be shown.
  7. If everything is fine in the previewed theme, click on "Install with Stylish" button at the top right corner of the page.
  8. A dialog box will open.
  9. Click on Install in the dialog box.

Steps for Google Chrome
  1. Install Stylish for Chrome from the Chrome Web Store.
  2. Navigate to Facebook.com and click on the S button.
  3. Click on "Find Styles for this Site" to open a new tab with free themes to use for Facebook.
  4. Click on any theme and a preview will be shown.
  5. If everything is fine in the previewed theme, click on "Install with Stylish" button at the top right corner of the page.

Stylish Button


facebook theme change

Install with stylish

Installing Ferrari theme for Stylish Firefox

Now whenever you open Facebook, it will show the theme that you have installed with Stylish instead of the boring old blue theme.
 

How to Change Facebook Theme, Color & Appearance 

Tags: Facebook, Facebook Themes, Facebook Tricks


Microsoft Windows 8 New Features

Microsoft Windows 8 New Features
Computer Tip 
By now you probably know that the new Windows 8 operating system from Microsoft was built to compliment touch-enabled monitors. If you don’t have such a monitor, you might be wondering if the other features are enough to warrant an upgrade at any price. Let’s take a look.

Windows 8 Features

The biggest change with Microsoft 8 is the new, tile-filled interface screen (called Metro) that makes your monitor look like an over-sized smartphone loaded with apps. If you really hate the interface, or if you keep tapping the monitor with your finger despite not having a touchscreen, it’s possible to turn it off altogether. Check out this handy article from PCWorld for a walkthrough on how to turn off Metro and get back the old Windows home screen you’re used to. Once you do, you’ll be impressed by a new – yet familiar – operating system that runs faster than Windows 7 and offers several handy new features, including:

Startup Time

Unlike Windows 7, Windows 8 stores your system state and memory contents so it can load them from the disk on reboot, instead of having to reload everything from scratch, which takes a whole lot longer. While results will vary from machine to machine, reports are that starup time with Windows 8 machines is half of what it was on Windows 7.

Windows Store

You have much easier access to the Windows Store where you can buy free and paid apps. While many of these are touch-based apps, you’ll also find a nice selection of mouse-friendly ones, too.

Built-In Antivirus

After you install Windows 8, you will automatically have Windows Defender on your computer, which is a hearty little antivirus program that offers ingoing and outgoing protection against malware.

Automatic Cloud Storage

Everything from your address book to your system settings can be stored in the cloud. Then you can access it on any Windows 8 PC. You can get your personal PC experience on your home computer, work laptop, and even at a friend’s house if they have a Windows 8 machine.

System-Wide Search

It’s a lot easier to hunt down that lost MP3 with the faster, more responsive system-wide search available in Windows 8. The search also connects to the Internet, so it’s really your one-stop-spot for browsing on your computer.

Also Read :


Microsoft Windows 8 New Features
Tags: Windows 8 Feature

Basic Tips For Starting Your Own Blog Website


Tips For Starting Your Own Blog Website
Tags: Creating Blogs Site, Hosting Provider, Blog Promotion, SEO Setup 
Blogging Tips
Blogging has developed from a specialized hobby to a full-time occupation. Many writers live off of their blogs, and anyone with something unique to say can gain an audience and a steady paycheck with the right techniques.

Starting A New Blog

Launching a blog requires some planning. This starts with the name and address of the blog.
It’s important to pick a good domain name, as the URL of a website is one of the most powerful tools that a blogger has at his disposal for repeat traffic. Think of a domain name as a 21st century toll free number: It has to be memorable or it won’t be effective.
  • blog’s domain name should be descriptive of its subject and preferably a bit unusual. For example, a blog about arrowheads could simply be titled, “Arrowheads And How To Identify Them,” but something like “As The Arrowhead Flies” would be more memorable.
Bloggers should also try to pick a unique subject or to bring a unique perspective to the entries. Writing about hundreds of subjects will rarely lead to a successful blog. Content should be focused and direct. Visitors should know exactly what type of information that they can find on the blog, and using direct and simple approach improves the chances of regular traffic.

Also Read : How to Setup and Troubleshoot Computer.

Blog Hosting Providers

Most bloggers use a hosting provider like WordPress.com or Blogger. There are several major advantages to these services. They’re inexpensive and may even be free until a blog develops large amounts of regular traffic. Also, the online blogging software provided by these hosting services offers instant, easy organization for a blog of any size.
Many bloggers know only basic HTML and don’t really want to invest a lot of time into things like page design. For these individuals, integration with a hosting provider can keep costs down while streamlining the blogging process. They’re also ideal for first time bloggers because they simplify the process. By using a hosting provider you’ll spend more time writing and less time worrying about page design and web programming languages.
Professional and amateur bloggers will need to consider the price and uptime of various hosting providers before making a selection. The service packages of websites like WordPress.com and Blogger change quite often in both price and offerings. It’s usually a good idea to start out with a package that offers at least 50% more capability for incoming traffic than you plan on using each month. This way, your blog won’t suddenly crash if you write a successful post.
Blogging services can quickly become expensive. They’re worth the money in the long run, as they’ll allow you to keep all of the earnings from ads on your new blog–which is something that free alternatives with “unlimited bandwidth” won’t offer you.
Speaking of money, you’ll have to be on the lookout for ways to make a profit from a blog. Most blogs use ads from Google and Amazon Marketplace. Many bloggers also offer other services and products directly from their sites.

Promoting Your Blog

Blogs need to be promoted in order to flourish. It’s very rare for a blog to receive large amounts of traffic from search engines like Google alone, especially when the blog’s just getting started. A good promotion strategy is absolutely essential, and a strong promotion strategy begins with social media websites.
Promote each blog post from a new blog on websites like Twitter and Facebook. Don’t spam your friends and followers; only post a single link to each blog post, and try to reach out to other bloggers through social websites. Developing a relationship with other writers will allow you to learn about the good habits that lead to regular traffic. You can even ask another writer to post a guest entry on your blog from time to time. This is a good way to build an audience of regular readers.
Always check the comments for each entry and respond to your readers. Cultivate a sense of community by interacting with each commenter and even addressing some of their questions or comments directly in new blog posts. This encourages the return traffic that is important for a new blog.
Finally, blog regularly. Any blog will fail if it doesn’t have regular posts. Posting once a day or more will keep visitors coming back and will quickly lead to better opportunities for money and better traffic. Every blogger should consider consistency to be extremely important–keep a consistent stream of quality entries for the best possible success. 

 
Tips For Starting Your Own Blog Website
Tags: Creating Blogs Site, Hosting Provider, Blog Promotion, SEO Setup 


How to Set Up and Troubleshoot a Home Computer Network


How to Set Up and Troubleshoot a Home Computer Network 
Tags: Computer Networking,Computer  Setup and Troubleshooting guide

Computer Networking Tips
Computer Networking
Setting up a home computer network may sound daunting, but it’s relatively simple, provided you break everything down into specific steps. Home computer networks are ideal for sharing a wireless connection among multiple computers, especially for those who have a home office, teenagers, or another computer configuration.

Purchasing a Router

Before you begin to worry about software, worry about hardware. A excellent router, like a Cisco router or a Linksys router, will save you from having to endlessly reboot and reprogram while still allowing you to quickly set up a home network. Make sure you buy from a company that has years of experience designing high quality routers that are capable of handling high amounts of traffic (such as data heavy media files). Virtually any home network will run smoothly without irritating slowness or delays.

Wireless Bandwidth

After you’ve purchased a router, the next step is to determine how much bandwidth you are receiving from your wireless connection. This becomes particularly important if you have a household where the network users are habitually downloading movies or other large data files. While a router can rapidly transfer this information, it is constrained by the amount of bandwidth available to the household. A connection that transmits data at 2.4 GHz with a 54 megabit speed is usually adequate to the task.
If your network feels exceptionally sluggish, check to make sure that you are receiving the wireless by ‘pinging’ the network. Alternatively, if you are receiving the full wireless bandwidth but are still experiencing slow results because of the types of media you are transferring, you may consider paying for a faster service.

Software Drivers

While software drivers for networking are fairly easy to find and download from the Internet, purchasing software directly from a computer retailer is recommended as a way to keep your network free of faulty software. A higher incidence of spyware and viruses makes downloading free software inadvisable, especially for something as sensitive as a computer network.
Purchasing software from one of the major companies, such as McAfee or Symantec, will also provide you with another vital component of wireless home networking: a firewall. Because wireless networks are difficult to secure, the best option is to buy software that not only allows you to network, but is built specifically to keep out uninvited users. Firewalls are designed to protect your valuable information behind a tightly secured ‘wall’ which can’t be accessed unless a very specific encrypted code is used.

Basic Set-Up

Now that you have all the components, you’ll want to set up the router first. Install the software driver onto each computer that will use the network. Set up a passkey that is fairly hard to break. Avoid simple or obvious terms that an outside user could easily guess. Set up each computer with this information.
The company that is providing your wireless connection will usually assign you a name and a passkey. However, in some configurations, you will be able to reprogram this information.

Troubleshooting

No matter how expertly a system is set up, on occasion a technical problem manifests, resulting in a lack of connectivity for computers. There are a few ways to quickly check what’s working and what’s not.
Usually, problems are caused by one of two things: the software on the computer itself is malfunctioning, and not allowing the computer to connect. You can test this by seeing if any other computers can connect to the network. If they can, the problem is local to that computer. A simple reboot of the software should solve this problem. However, if the software continues to be unable to connect to the internet, you will need to uninstall the software, and then reinstall it. Sometimes, a version can become corrupted. By wiping it clean and starting anew, the problem should resolve itself.
The second most common problem is that the router needs a quick reboot. If you purchase a quality router, you will not have this problem very often, although every now and again even the best routers need a quick reboot. Turn the router off for at least thirty seconds. Switch it back on, and check your connectivity in about ten minutes. This gives the system plenty of time to reset itself.
If this doesn’t work, the wireless provider may temporarily be out. Call your wireless provider to determine if they are experiencing an outage, and when you can expect the resumption of service. If all of these methods don’t resolve your problem, there is a basic flaw in your initial setup. 

Also Read How-activate-windows-8.1

How to Set Up and Troubleshoot a Home Computer Network

Tags: Computer Networking,Computer  Setup and Troubleshooting guide

 
-->