Showing posts with label Computer Tweaks. Show all posts

Wednesday, May 21, 2014

Tutorials on how the Windaows XP boot faster

Boot Your Windows XP Operating System Faster

Tags: Windows XP Tweaks, Computer Tips
Step by step Procedures:

1. Open notepad.exe, type "del c:\windows\prefetch\ntosboot-*.* /q" (without the quotes) & save as "ntosboot.bat" in c:\

2. From the Start menu, select "Run..." & type "gpedit.msc".

3. Double click "Windows Settings" under "Computer Configuration" and double click again on "Shutdown" in the right window.

4. In the new window, click "add", "Browse", locate your "ntosboot.bat" file & click "Open".

5. Click "OK", "Apply" & "OK" once again to exit.

6. From the Start menu, select "Run..." & type "devmgmt.msc".

7. Double click on "IDE ATA/ATAPI controllers"

8. Right click on "Primary IDE Channel" and select "Properties".

9. Select the "Advanced Settings" tab then on the device or 1 that doesn't have 'device type' greyed out select 'none' instead of 'autodetect' & click "OK".

10. Right click on "Secondary IDE channel", select "Properties" and repeat step 9.

11. Reboot your computer.

Tags: Windows XP Tweaks, Computer Tips 

Friday, May 9, 2014

How to Change Facebook Theme, Color & Appearance

How to Change Facebook Theme, Color & Appearance 

Tags: Facebook, Facebook Themes, Facebook Tricks

Facebook is a social networking site which enables people to connect with friends and people around. That's how Facebook is usually introduced. However, Facebook is beyond the need of being introduced as almost everyone is on it. Despite its popularity, Facebook has one flaw; the default blue theme is really boring.
Some even consider it an annoyance while visiting Facebook. As Facebook does not allow users to change its theme like MySpace used to, users are left with no other option but to bear the theme Facebook wants them to use.

However, it is relatively easy to change the Facebook theme to a stylish one using an addon and custom themes which are available free of cost on the internet.

An example of the final outcome would be something like in the image.

Change Facebook Theme
This is the Ferrari theme. More themes are available for you to choose.


Requirement: The basic requirement for this to work is to have Mozilla Firefox or Google Chrome as your browser.
Steps to achieve this: If you use Google Chrome, click here. Mozilla Firefox users should carry out the following steps to successfully change Facebook theme.
  1. Open Mozilla Firefox and install 'Stylish' addon.
  2. Follow the basic steps to install the addon.
  3. Restart Firefox after successfully installing the Stylish addon.
  4. Login to your Facebook Account and click on the small 'S' button in your Firefox status bar.
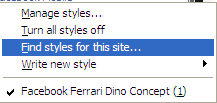
  5. Click on "Find Styles for this Site" to open a new tab with free themes to use for Facebook.
  6. Click on any theme and a preview will be shown.
  7. If everything is fine in the previewed theme, click on "Install with Stylish" button at the top right corner of the page.
  8. A dialog box will open.
  9. Click on Install in the dialog box.

Steps for Google Chrome
  1. Install Stylish for Chrome from the Chrome Web Store.
  2. Navigate to Facebook.com and click on the S button.
  3. Click on "Find Styles for this Site" to open a new tab with free themes to use for Facebook.
  4. Click on any theme and a preview will be shown.
  5. If everything is fine in the previewed theme, click on "Install with Stylish" button at the top right corner of the page.

Stylish Button


facebook theme change

Install with stylish

Installing Ferrari theme for Stylish Firefox

Now whenever you open Facebook, it will show the theme that you have installed with Stylish instead of the boring old blue theme.
 

How to Change Facebook Theme, Color & Appearance 

Tags: Facebook, Facebook Themes, Facebook Tricks


Basic Tips For Starting Your Own Blog Website


Tips For Starting Your Own Blog Website
Tags: Creating Blogs Site, Hosting Provider, Blog Promotion, SEO Setup 
Blogging Tips
Blogging has developed from a specialized hobby to a full-time occupation. Many writers live off of their blogs, and anyone with something unique to say can gain an audience and a steady paycheck with the right techniques.

Starting A New Blog

Launching a blog requires some planning. This starts with the name and address of the blog.
It’s important to pick a good domain name, as the URL of a website is one of the most powerful tools that a blogger has at his disposal for repeat traffic. Think of a domain name as a 21st century toll free number: It has to be memorable or it won’t be effective.
  • blog’s domain name should be descriptive of its subject and preferably a bit unusual. For example, a blog about arrowheads could simply be titled, “Arrowheads And How To Identify Them,” but something like “As The Arrowhead Flies” would be more memorable.
Bloggers should also try to pick a unique subject or to bring a unique perspective to the entries. Writing about hundreds of subjects will rarely lead to a successful blog. Content should be focused and direct. Visitors should know exactly what type of information that they can find on the blog, and using direct and simple approach improves the chances of regular traffic.

Also Read : How to Setup and Troubleshoot Computer.

Blog Hosting Providers

Most bloggers use a hosting provider like WordPress.com or Blogger. There are several major advantages to these services. They’re inexpensive and may even be free until a blog develops large amounts of regular traffic. Also, the online blogging software provided by these hosting services offers instant, easy organization for a blog of any size.
Many bloggers know only basic HTML and don’t really want to invest a lot of time into things like page design. For these individuals, integration with a hosting provider can keep costs down while streamlining the blogging process. They’re also ideal for first time bloggers because they simplify the process. By using a hosting provider you’ll spend more time writing and less time worrying about page design and web programming languages.
Professional and amateur bloggers will need to consider the price and uptime of various hosting providers before making a selection. The service packages of websites like WordPress.com and Blogger change quite often in both price and offerings. It’s usually a good idea to start out with a package that offers at least 50% more capability for incoming traffic than you plan on using each month. This way, your blog won’t suddenly crash if you write a successful post.
Blogging services can quickly become expensive. They’re worth the money in the long run, as they’ll allow you to keep all of the earnings from ads on your new blog–which is something that free alternatives with “unlimited bandwidth” won’t offer you.
Speaking of money, you’ll have to be on the lookout for ways to make a profit from a blog. Most blogs use ads from Google and Amazon Marketplace. Many bloggers also offer other services and products directly from their sites.

Promoting Your Blog

Blogs need to be promoted in order to flourish. It’s very rare for a blog to receive large amounts of traffic from search engines like Google alone, especially when the blog’s just getting started. A good promotion strategy is absolutely essential, and a strong promotion strategy begins with social media websites.
Promote each blog post from a new blog on websites like Twitter and Facebook. Don’t spam your friends and followers; only post a single link to each blog post, and try to reach out to other bloggers through social websites. Developing a relationship with other writers will allow you to learn about the good habits that lead to regular traffic. You can even ask another writer to post a guest entry on your blog from time to time. This is a good way to build an audience of regular readers.
Always check the comments for each entry and respond to your readers. Cultivate a sense of community by interacting with each commenter and even addressing some of their questions or comments directly in new blog posts. This encourages the return traffic that is important for a new blog.
Finally, blog regularly. Any blog will fail if it doesn’t have regular posts. Posting once a day or more will keep visitors coming back and will quickly lead to better opportunities for money and better traffic. Every blogger should consider consistency to be extremely important–keep a consistent stream of quality entries for the best possible success. 

 
Tips For Starting Your Own Blog Website
Tags: Creating Blogs Site, Hosting Provider, Blog Promotion, SEO Setup 


How to Set Up and Troubleshoot a Home Computer Network


How to Set Up and Troubleshoot a Home Computer Network 
Tags: Computer Networking,Computer  Setup and Troubleshooting guide

Computer Networking Tips
Computer Networking
Setting up a home computer network may sound daunting, but it’s relatively simple, provided you break everything down into specific steps. Home computer networks are ideal for sharing a wireless connection among multiple computers, especially for those who have a home office, teenagers, or another computer configuration.

Purchasing a Router

Before you begin to worry about software, worry about hardware. A excellent router, like a Cisco router or a Linksys router, will save you from having to endlessly reboot and reprogram while still allowing you to quickly set up a home network. Make sure you buy from a company that has years of experience designing high quality routers that are capable of handling high amounts of traffic (such as data heavy media files). Virtually any home network will run smoothly without irritating slowness or delays.

Wireless Bandwidth

After you’ve purchased a router, the next step is to determine how much bandwidth you are receiving from your wireless connection. This becomes particularly important if you have a household where the network users are habitually downloading movies or other large data files. While a router can rapidly transfer this information, it is constrained by the amount of bandwidth available to the household. A connection that transmits data at 2.4 GHz with a 54 megabit speed is usually adequate to the task.
If your network feels exceptionally sluggish, check to make sure that you are receiving the wireless by ‘pinging’ the network. Alternatively, if you are receiving the full wireless bandwidth but are still experiencing slow results because of the types of media you are transferring, you may consider paying for a faster service.

Software Drivers

While software drivers for networking are fairly easy to find and download from the Internet, purchasing software directly from a computer retailer is recommended as a way to keep your network free of faulty software. A higher incidence of spyware and viruses makes downloading free software inadvisable, especially for something as sensitive as a computer network.
Purchasing software from one of the major companies, such as McAfee or Symantec, will also provide you with another vital component of wireless home networking: a firewall. Because wireless networks are difficult to secure, the best option is to buy software that not only allows you to network, but is built specifically to keep out uninvited users. Firewalls are designed to protect your valuable information behind a tightly secured ‘wall’ which can’t be accessed unless a very specific encrypted code is used.

Basic Set-Up

Now that you have all the components, you’ll want to set up the router first. Install the software driver onto each computer that will use the network. Set up a passkey that is fairly hard to break. Avoid simple or obvious terms that an outside user could easily guess. Set up each computer with this information.
The company that is providing your wireless connection will usually assign you a name and a passkey. However, in some configurations, you will be able to reprogram this information.

Troubleshooting

No matter how expertly a system is set up, on occasion a technical problem manifests, resulting in a lack of connectivity for computers. There are a few ways to quickly check what’s working and what’s not.
Usually, problems are caused by one of two things: the software on the computer itself is malfunctioning, and not allowing the computer to connect. You can test this by seeing if any other computers can connect to the network. If they can, the problem is local to that computer. A simple reboot of the software should solve this problem. However, if the software continues to be unable to connect to the internet, you will need to uninstall the software, and then reinstall it. Sometimes, a version can become corrupted. By wiping it clean and starting anew, the problem should resolve itself.
The second most common problem is that the router needs a quick reboot. If you purchase a quality router, you will not have this problem very often, although every now and again even the best routers need a quick reboot. Turn the router off for at least thirty seconds. Switch it back on, and check your connectivity in about ten minutes. This gives the system plenty of time to reset itself.
If this doesn’t work, the wireless provider may temporarily be out. Call your wireless provider to determine if they are experiencing an outage, and when you can expect the resumption of service. If all of these methods don’t resolve your problem, there is a basic flaw in your initial setup. 

Also Read How-activate-windows-8.1

How to Set Up and Troubleshoot a Home Computer Network

Tags: Computer Networking,Computer  Setup and Troubleshooting guide

Thursday, May 8, 2014

How Activate Windows 8.1 Pro and Windows 8.1 Enterprise - Offline Activator

How Activate Windows 8.1 Pro and Windows 8.1 Enterprise | Offline Activator

This is the procedure on How to Activate your Windows 8.1 Pro / Enterprise!

Windows 8.1 Activition Tutorials

TAGS: Free Windows 8.1 Activation, Free Windows 8.1 Downloads


OPTION #1:
STEPS:
  • REMOVE installation key first follow this Screen Shots Download Win Act
  • [ Download Link ] then Run
Windows 8.1 Activition Tutorials
  • Download activator [ Download Link ]
  • Right click A9600E "from enterprise or pro" and select run as administrator follow my screen shot below
Windows 8.1 Activition Tutorials
  •  Check your Computer properties looks like this
Windows 8.1 Activition Tutorials

  •  Download and Unzip My_WCP_watermark_editor.zip [ Download Link ]

Windows 8.1 Activition Tutorials
  • follow Screen Shot below and wait to complete the Processed
Windows 8.1 Activition Tutorials
 Done!


OPTION #2: 

  • Download W8.1 Pro [ Download Link ]
  • REMOVE installation key first follow this Screen Shots Download WinAct 
  • [ Download Link ] then Run
Windows 8.1 Activition Tutorials

  • Run CMD as Administrator
    type SLUI 3 enter this serial key
    NTTX3-RV7VB-T7X7F-WQYYY-9Y92F
    wait for system to accept the key and prompt that it's done.

  • Run CMD as Administrator
    type SLUI 4, select UNITED KINGDOM, next you will see your installation I.D this must be appeared in the installation I.D (if NOT DO NOT CONTINUE This process and proceed to the Activation 1)
    installation i.d 5798411 5450483 2943601 1243920 6545380 2885066 9612621 9251254 1949360 

  • Click ENTER CONFIRMATION I.D and enter to fields this confirmation
        Confirmation Keys:

         A 054343
          B 968884
          C 830996
          D 505981
          E 885621
          F 883754

          G 975792
          H 926443
 
  • Click ACTIVATE WINDOWS and wait for the process to finish and prompt saying "Thanks, you're all done." then click Close and restart. 

  • If you still have watermark, Just use watermark remover [ Download here
  • Done! 

Wednesday, May 7, 2014

How to Create Your Own 'Via' status on your Facebook Post

How to Create Your Own  'Via' status on your Facebook  Post


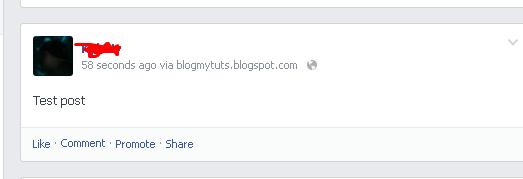
Did you notice someone posted a wall post with  a via device notice ?
This custom status usually will show where the status was posted from and seems to be fixed according to the device they log the status in.
This is the trick for it :)
If  your are familiar  on  Apps making  like Facebook comment box this is  similar to it.

1.Go to  https://developers.facebook.com/apps    click Create apps.

NOTE: Your Account must be Verified  user via  MOBILE


2. Now  Create your  app   Type your Display Name
Choose your  Category
Click Create Apps


3.  Input the security


NOTE:  If your facebook account is not verified this will pop out


4. after creating your app  copy your application identification .

NOTE: Display Name will be your Via Status


5.  Now  your ready for your custom  via status   just edit the color RED  change it your own ID and url


How to Create Your Own  'Via' status on your Facebook  Post

TAGS: How to create facebook status via post

 
-->